




A native blur overlay for React Native: it blurs whatever is rendered behind it and lets you put your own content on top — full-screen, one rounded panel, or a floating Liquid Glass tab bar that looks the same on iOS and Android.
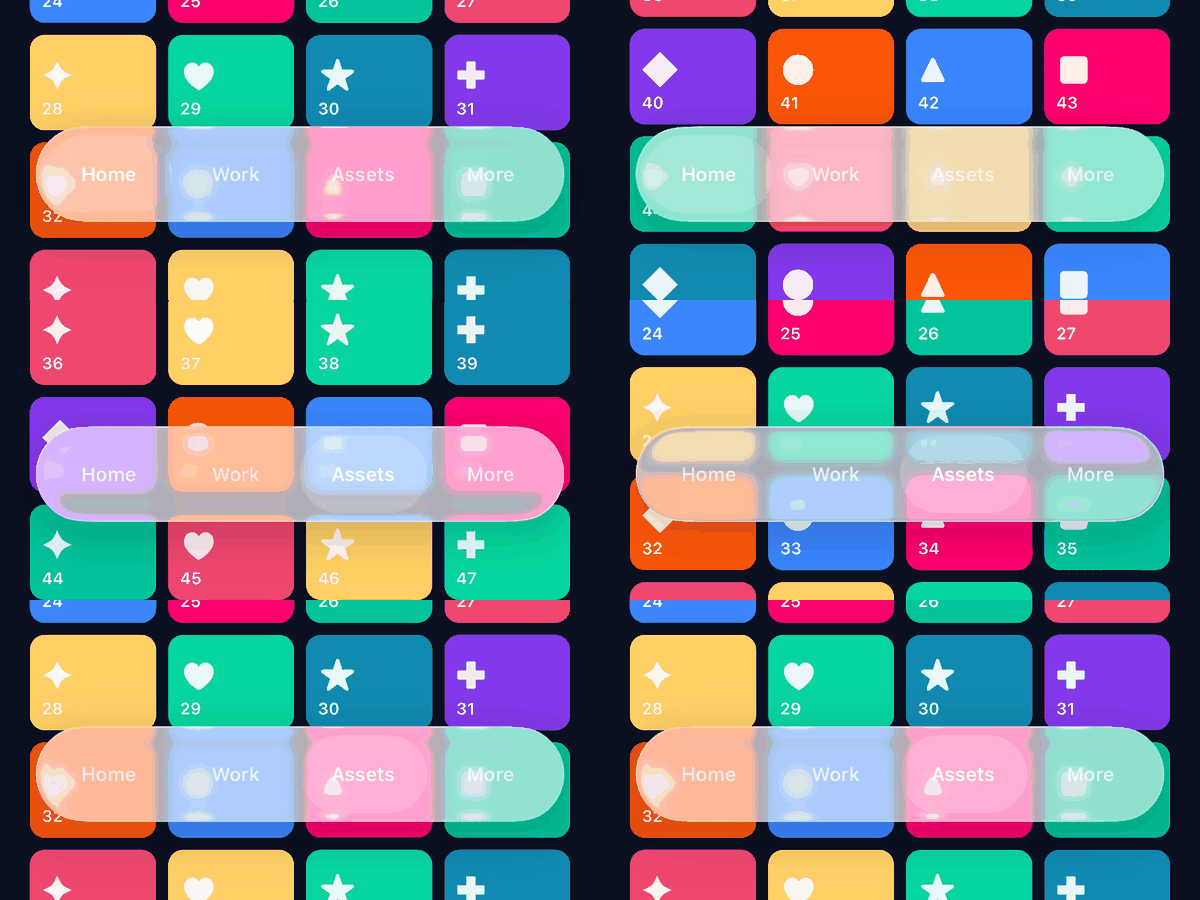
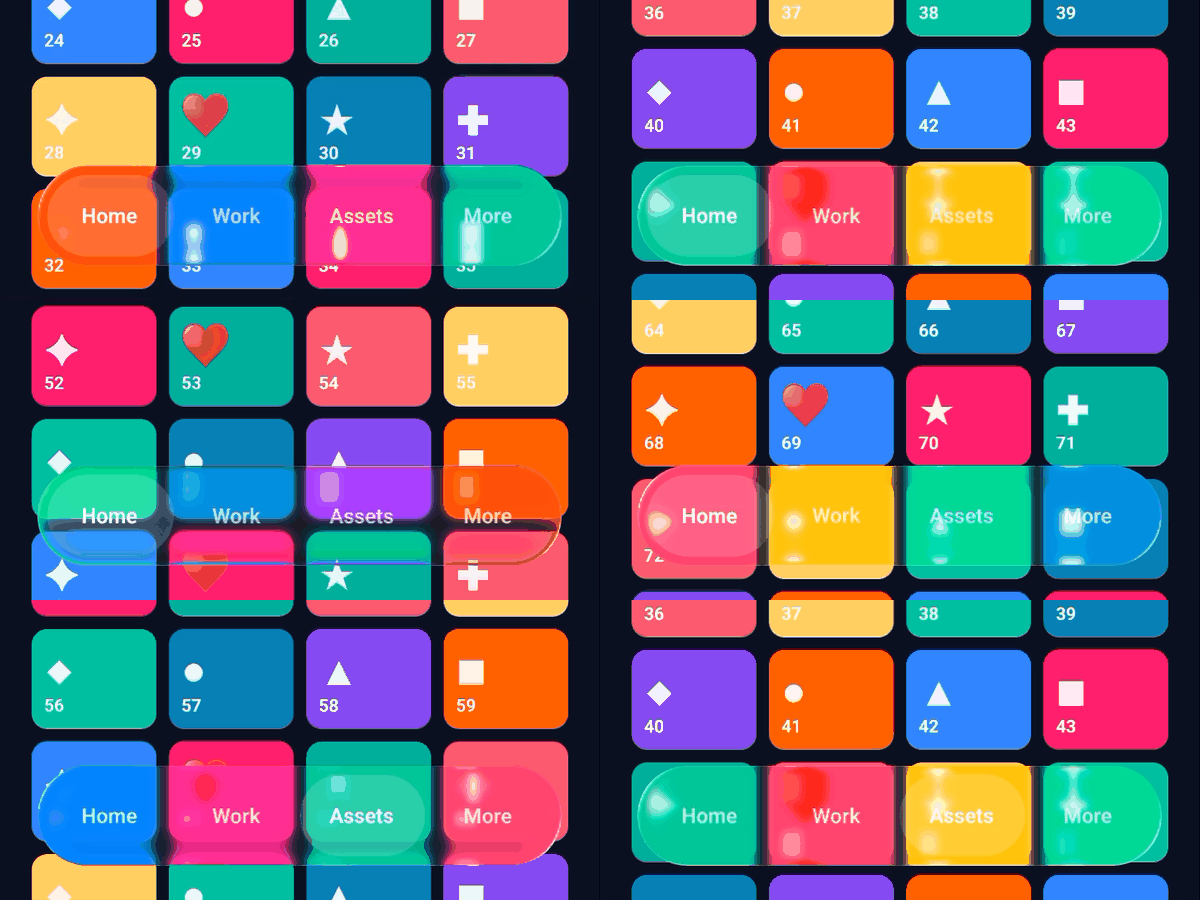
The same component, the same props — blurMode="glass" — on iOS 26 (Apple's own Liquid Glass, first) and on Android 13 (a Galaxy A22, 2021 low-end hardware, second).
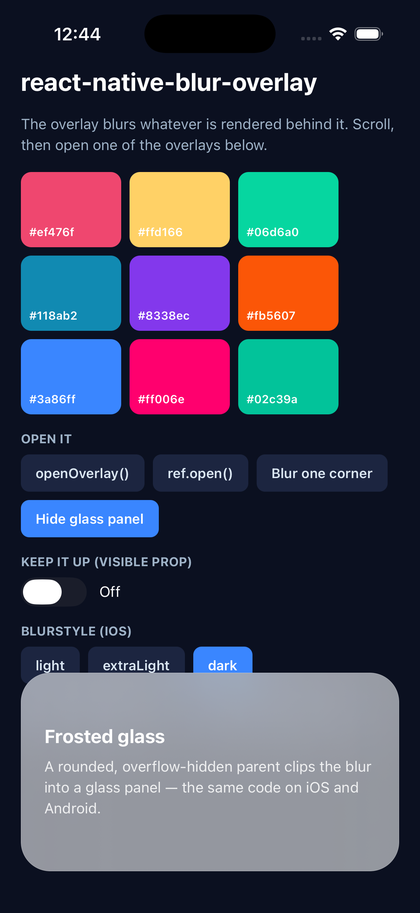
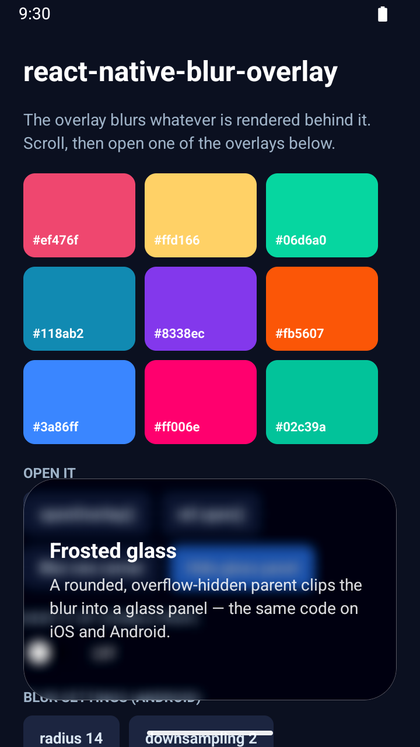
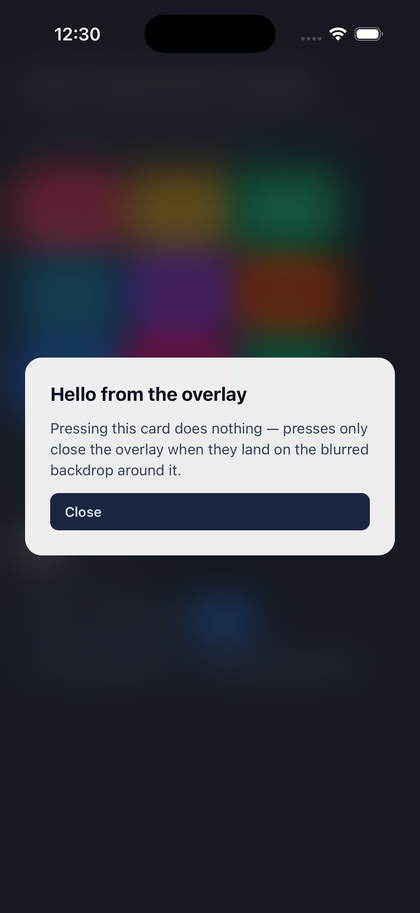
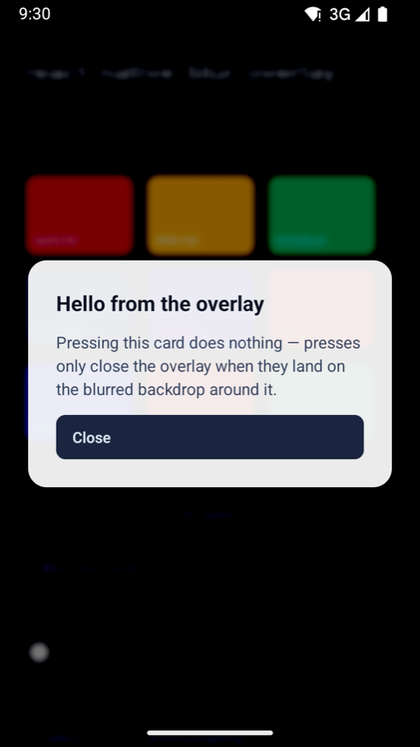
The example app on the New Architecture. The first two are the same glass panel, same code, on iOS and Android; then a full-screen overlay on each.
- Liquid Glass on both platforms —
blurMode="glass"is Apple's own glass on iOS 26 and a matching refracting lens on Android 13 - Frosted-glass panels on both platforms — the same code that gives you a
UIVisualEffectViewmaterial on iOS gives you a matching glass panel on Android - Live blur on Android 12+ — content scrolling behind the glass stays blurred, as it always has on iOS
- Blur behind a
<Modal>, which no capture-based library on Android can reach - Works on the New Architecture (Fabric, via Codegen) and on the legacy architecture
- TypeScript types included
- Autolinked — no Podfile or
MainApplicationedits - No third-party dependencies
3.1 is additive. Live blur and glass are opt-in and
snapshotstays the default, so an app upgrading from 3.0 sees no change until it asks for one. Coming from 2.x, see Migrating from 2.x.
| React Native | >= 0.80 (New Architecture and legacy both supported) |
| iOS | 15.1+ |
| Android | minSdk 24+ · live blur needs API 31+ (Android 12), and degrades to a snapshot below it |
For older React Native versions use react-native-blur-overlay@2.
npm install react-native-blur-overlaycd ios && pod installThat's it — the library is autolinked. If you are upgrading from 2.x, remove the manual pod 'SajjadBlurOverlay', :path => ... line from your Podfile and the manual add(SajjadBlurOverlayPackage()) call from MainApplication.
Works in Expo apps that build their own native code — a development build, npx expo prebuild, or EAS Build — on Expo SDK 54 or newer (the first to ship React Native 0.80+; SDK 54 has 0.81). Verified on SDK 57, with snapshot, live and glass on iOS 26 and Android:
npx expo install react-native-blur-overlayThen rebuild the native app (npx expo run:ios / npx expo run:android, or a new EAS build). No config plugin is needed: the library is autolinked and asks for no native project changes.
It does not work in Expo Go. Expo Go can only run the native code Expo ships inside it, and no third-party native library can be added to it — the overlay's component will not be found there.
import { useRef } from 'react';
import { Button, StyleSheet, Text, View } from 'react-native';
import BlurOverlay, { closeOverlay, openOverlay } from 'react-native-blur-overlay';

export default function App() {
  return (
    <View style={styles.container}>
      <Button title="Blur it" onPress={() => openOverlay()} />

      <BlurOverlay
        blurStyle="dark"
        radius={14}
        downsampling={2}
        brightness={-200}
        onPress={() => closeOverlay()}
        style={styles.center}
      >
        <View style={styles.card}>
          <Text>Anything you render here sits on top of the blur.</Text>
          <Button title="Close" onPress={() => closeOverlay()} />
        </View>
      </BlurOverlay>
    </View>
  );
}

const styles = StyleSheet.create({
  container: { flex: 1, alignItems: 'center', justifyContent: 'center' },
  center: { alignItems: 'center', justifyContent: 'center' },
  card: { backgroundColor: 'white', borderRadius: 12, padding: 24 },
});1. The openOverlay / closeOverlay helpers — handy when the overlay lives far away from the code that opens it:
import BlurOverlay, { closeOverlay, openOverlay } from 'react-native-blur-overlay';

<BlurOverlay onPress={() => closeOverlay()}>{/* ... */}</BlurOverlay>;

openOverlay();
Pass an id when more than one overlay can be mounted at the same time, and use the same id on both sides:
<BlurOverlay id="settings" />;

openOverlay('settings');
closeOverlay('settings');
2. A ref, if you would rather not use module-level functions:
const overlay = useRef<BlurOverlayInstance>(null);

<BlurOverlay ref={overlay} onPress={() => overlay.current?.close()}>{/* ... */}</BlurOverlay>;

overlay.current?.open();
3. The visible prop, for fully declarative control (also the way to keep the overlay up permanently):
const [visible, setVisible] = useState(false);

<BlurOverlay visible={visible} onPress={() => setVisible(false)} />;

// Always blurred:
<BlurOverlay visible />
When visible is set, the imperative API is ignored for that overlay.
| Prop | Type | Default | Platform | Description |
|---|---|---|---|---|
visible |
boolean |
— | both | Controls the overlay declaratively. When set, the imperative API is ignored. |
id |
string |
'default' |
both | Id used by openOverlay(id) / closeOverlay(id). |
blurRadius |
number |
— | Android | Blur radius in dp, the same amount on every screen. Wins over radius. iOS has no blur-amount control. |
radius |
number |
20 |
Android | Deprecated — use blurRadius. Blur radius in physical pixels — see choosing a radius. |
downsampling |
number |
1, or 2 when blurMode="live" |
Android | How much the capture is scaled down before blurring. Higher is faster and coarser. |
brightness |
number |
0 |
Android | Brightness offset, -255..255. Negative darkens. |
glassVariant |
'regular' | 'clear' |
'regular' |
both | Which Liquid Glass: regular is frosted and milky, clear is translucent, for glass over rich content. |
glassTint |
ColorValue |
— | both | Colour of the glass body; its alpha is the strength. |
interactive |
boolean |
false |
both | Glass that responds to touch. |
saturation |
number |
1 |
Android | Colour saturation of the blur: 1 leaves it, 0 is grey, above 1 is more vivid. A blur washes colour out; iOS materials put it back at about 1.8. |
blurMode |
'snapshot' | 'live' | 'glass' |
'snapshot' |
Android; glass on both |
live re-blurs a <BlurTarget> as it draws, or — inside a <Modal> — asks the system to blur behind the modal's window. glass is live plus a refracting edge on Android 13+, and the system Liquid Glass on iOS 26+. Each falls back a step wherever it cannot run. |
blurTargetId |
string |
'default' |
Android | Which <BlurTarget> a live overlay captures. |
maxUpdateFps |
number |
30 |
Android | Upper bound on live re-blurs per second. 0 means every drawn frame. |
captureOutset |
number |
0 |
Android | How far past the overlay's edges a live capture reaches, in radius pixels. Removes the clamped edge a blur leaves at its border. |
snapshotUpdateFps |
number |
0 |
Android | Retakes the snapshot blur this many times a second. 0 takes it once and freezes it. The only way to get a moving backdrop below Android 12. |
blurStyle |
BlurStyle |
'light' |
iOS | Which UIBlurEffectStyle to use, see below. |
vibrant |
boolean |
false |
iOS | Renders the children inside a UIVibrancyEffect view. |
fadeDuration |
number |
500 |
both | Fade in/out duration in ms. 0 disables the animation. |
onPress |
() => void |
— | both | Called when the blurred backdrop is pressed. |
closeOnChildPress |
boolean |
false |
both | Also report presses that land on the children through onPress. |
backdropAccessibilityLabel |
string |
'Close overlay' |
both | Accessibility label of the pressable backdrop. |
onShow |
() => void |
— | both | Called once the overlay is fully faded in. |
onHide |
() => void |
— | both | Called once the overlay is fully faded out. |
style |
StyleProp<ViewStyle> |
fills the parent | both | Style of the blurred surface. |
children |
ReactNode |
— | both | Content rendered on top of the blur. |
BlurStyle is one of 'light', 'extraLight', 'dark', 'regular', 'prominent', 'systemUltraThinMaterial', 'systemThinMaterial', 'systemMaterial', 'systemThickMaterial', 'systemChromeMaterial'. The system* styles follow the device's light/dark appearance.
Deprecated aliases, still honoured: idBlur (→ id), customStyles (→ style), animationDuration (→ fadeDuration).
import BlurOverlay, {
  BlurTarget,
  openOverlay,
  closeOverlay,
  DEFAULT_ID,
  type BlurMode,
  type BlurOverlayProps,
  type BlurOverlayInstance,
  type BlurStyle,
  type BlurTargetProps,
} from 'react-native-blur-overlay';| Export | Description |
|---|---|
openOverlay(id?) |
Fades in the overlay mounted with that id. |
closeOverlay(id?) |
Fades it out. |
DEFAULT_ID |
The id used when none is given. |
ref.open() / ref.close() |
The same, per instance. |
<BlurTarget id?> |
The subtree a live Android overlay blurs. A plain <View> everywhere else. |
iOS uses a UIVisualEffectView, so the blur is live: whatever moves behind the overlay stays blurred while it moves.
Android has no equivalent system view, so the library does the work itself. There are three ways it can get a backdrop, and which one you get depends on blurMode and on where the overlay is mounted:
| What it does | Needs | Costs | |
|---|---|---|---|
snapshot (default) |
Draws the screen behind the overlay into a bitmap once, blurs it off the main thread, and holds it. A still image — content that moves behind the overlay is not re-blurred. | API 24 | Nothing per frame. One software capture plus one Stack Blur each time it is taken. |
live, in the app's window |
Re-records a <BlurTarget> subtree into a RenderNode as it draws and hands it to the RenderThread with a blur RenderEffect. Content moving behind the overlay stays blurred, as on iOS. |
API 31+ and a <BlurTarget> |
One re-record and one GPU blur per drawn frame, capped by maxUpdateFps. Nothing at all on a still screen. Measured below. |
glass |
live, plus one AGSL shader chained after the blur: the backdrop bends inward and folds back on itself toward the rim, under a thin, directionally lit hairline. More below. |
API 33+ and a <BlurTarget>; falls back to live on API 31–32 |
live's cost plus ~0.4ms of RenderThread time per frame. Never runs above half resolution. |
live, inside a <Modal> |
Asks the system to blur behind the modal's whole window. A modal is its own Android window and no capture can reach across one, so this is the only way. | API 31+, cross-window blur enabled, and an overlay covering the modal | Nothing — SurfaceFlinger composites it. |
Each one falls back to the one above it, so blurMode="live" is safe to set unconditionally: below API 31, without a <BlurTarget>, or where cross-window blur is off, the overlay quietly shows a snapshot instead. It says which reason applied in logcat, once, under the BlurOverlay tag.
snapshotUpdateFps is the fourth option, and the only one available below Android 12: it retakes the snapshot on a timer rather than freezing it.
These hold for every mode:
- The capture is cropped to the overlay's position on screen, so an overlay that covers part of the screen blurs exactly that part.
- The blur is drawn under everything React Native draws for the overlay, so
borderRadius,borderWidthandbackgroundColoron the overlay itself all work: the radius shapes the blur, a translucentbackgroundColortints it, and the border frames it. (Before 3.1 the blur was the overlay's background drawable, so setting any of those three replaced it and did nothing.) One limit: a live blur can only be clipped to a uniform corner radius — per-corner radii likeborderTopLeftRadiusshape a snapshot but leave a live blur square. SurfaceView-backed content — video players, camera previews, maps — cannot be captured and comes out blank. The window blur inside a<Modal>is the exception, since the system composites it rather than us.
Blurring a snapshot used to be done with RenderScript, which Android deprecated in Android 12 and no longer ships to new builds. 3.0 replaces it with a Stack Blur implementation that works on every supported API level; live blur uses the platform's own RenderEffect instead and never touches Stack Blur.
A blur overlay does not have to cover the screen. Size it to a box and you get a frosted-glass surface — a sheet, a card, a tab bar — on both platforms:
// The parent's rounded corners are what shape the glass, on both platforms.
const styles = StyleSheet.create({
  clip: {
    position: 'absolute',
    left: 20,
    right: 20,
    bottom: 40,
    height: 190,
    borderRadius: 28,
    overflow: 'hidden',
  },
  panel: {
    width: '100%',
    height: '100%',
    borderRadius: 28,
    borderWidth: StyleSheet.hairlineWidth,
    borderColor: 'rgba(255,255,255,0.35)',
    justifyContent: 'center',
    padding: 22,
    gap: 8,
  },
});

<View pointerEvents="box-none" style={styles.clip}>
  <BlurOverlay
    visible={showPanel}
    blurStyle="systemThinMaterial" // iOS
    radius={20} // Android
    downsampling={2}
    brightness={-16}
  >
    <View style={styles.panel}>
      <Text style={styles.title}>Frosted glass</Text>
      <Text style={styles.body}>Same code on iOS and Android.</Text>
    </View>
  </BlurOverlay>
</View>
Two things to know:
- A rounded,
overflow: 'hidden'parent is what shapes the glass on both platforms, and is what the snippet above uses. On Android you no longer need it: since 3.1 aborderRadius,borderWidthorbackgroundColorset on the overlay itself shapes, frames and tints the blur directly, where up to 3.0 all three were ignored — the blur was the view's background drawable and replaced them. On iOS the blur is aUIVisualEffectViewinside the overlay, so a radius on the overlay does not clip it and the parent is still the portable answer. - On Android the glass is a still image by default of what was behind the
panel when it appeared (see How it works), so it
suits panels that appear over settled content — sheets, dialogs, menus.
Content scrolling behind an already-visible panel will not re-blur. On iOS the
same panel is live; on Android 12+ you can make it live too, with
blurMode="live", and below that you can at least update it coarsely.
blurMode="glass" is the iOS 26 Liquid Glass look, on both platforms, from one prop:
<BlurTarget style={{ flex: 1 }}>
  <FlatList /* ...your content... */ />
</BlurTarget>

<BlurOverlay
  visible
  blurMode="glass"
  glassVariant="regular"   // or "clear"
  interactive              // responds to touch
  style={{
    position: 'absolute', left: 24, right: 24, bottom: 32, height: 64,
    borderRadius: 32,                         // a capsule: half the height
    borderWidth: StyleSheet.hairlineWidth,
    borderColor: 'rgba(255,255,255,0.22)',
  }}
>
  {/* your tabs */}
</BlurOverlay>
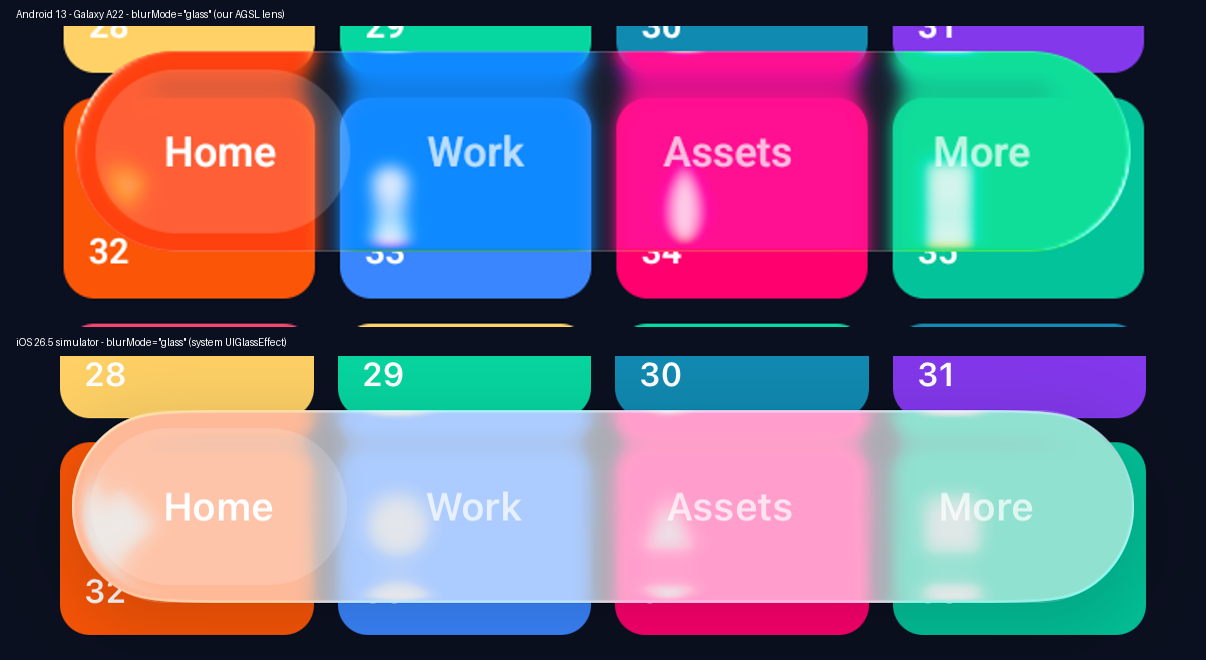
On iOS 26+ it is Apple's own UIGlassEffect, shaped to the overlay's borderRadius — a capsule when the radius is half the height. The blur amount is Apple's; blurRadius, saturation and downsampling are Android-only and ignored here. Below iOS 26 it is the ordinary blurStyle blur. Children sit inside the glass's content view, as Apple intends, so vibrant does not apply.
Variants, tint and touch map one to one:
| Prop | iOS 26+ | Android 13+ |
|---|---|---|
glassVariant="regular" (default) |
UIGlassEffectStyleRegular |
a 10dp blur, lifted toward white — the milky, legible look |
glassVariant="clear" |
UIGlassEffectStyleClear |
a 5dp blur, not lifted: vivid and translucent |
glassTint |
tintColor |
the body mixes toward the colour by its alpha |
interactive |
interactive |
a soft light blooms under the finger, and the rim brightens |
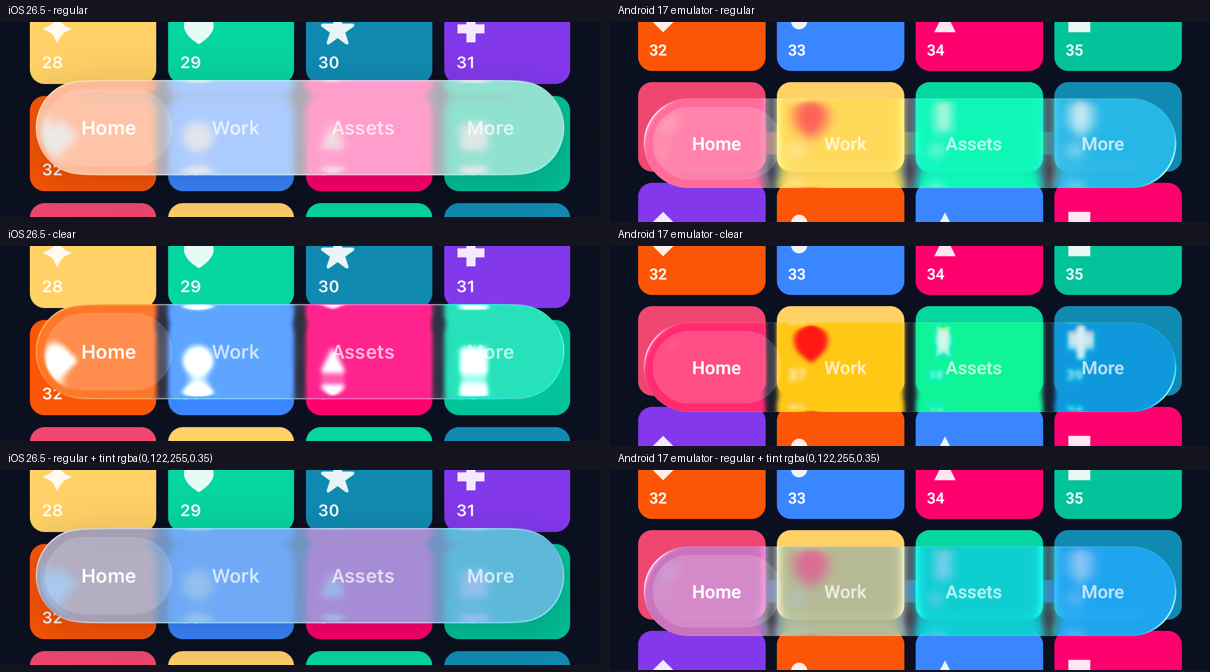
interactive, pressed and slid along the bar:
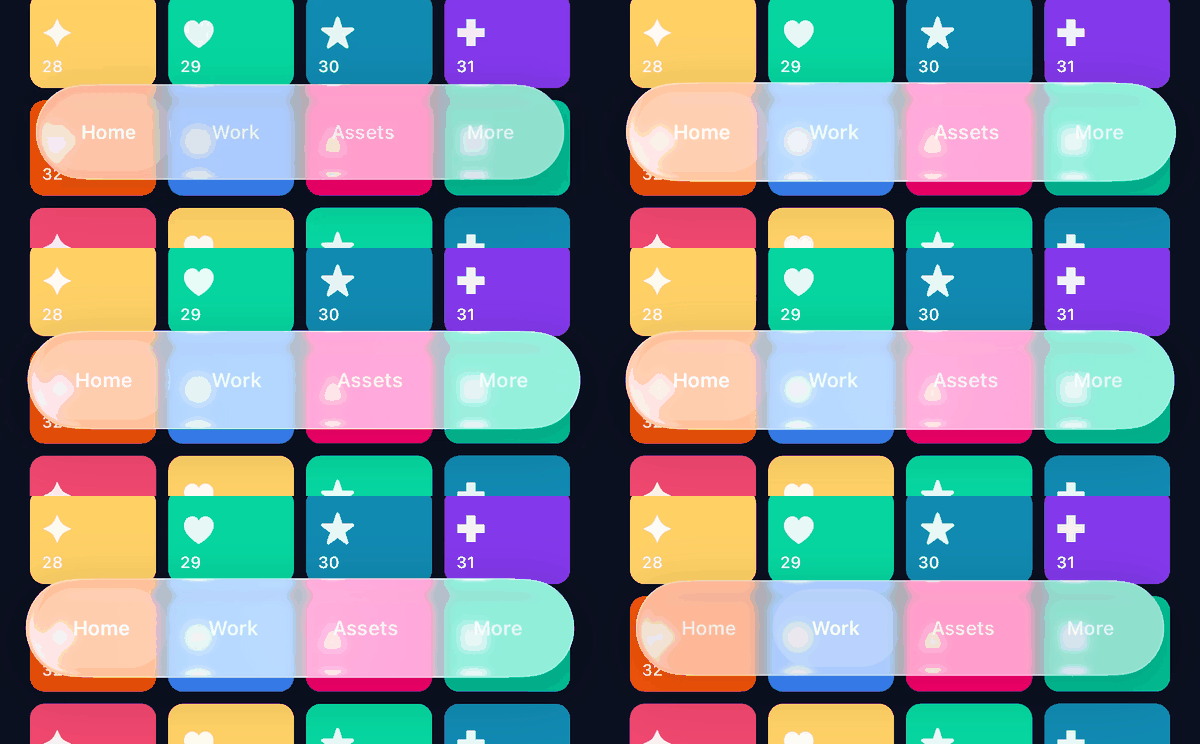
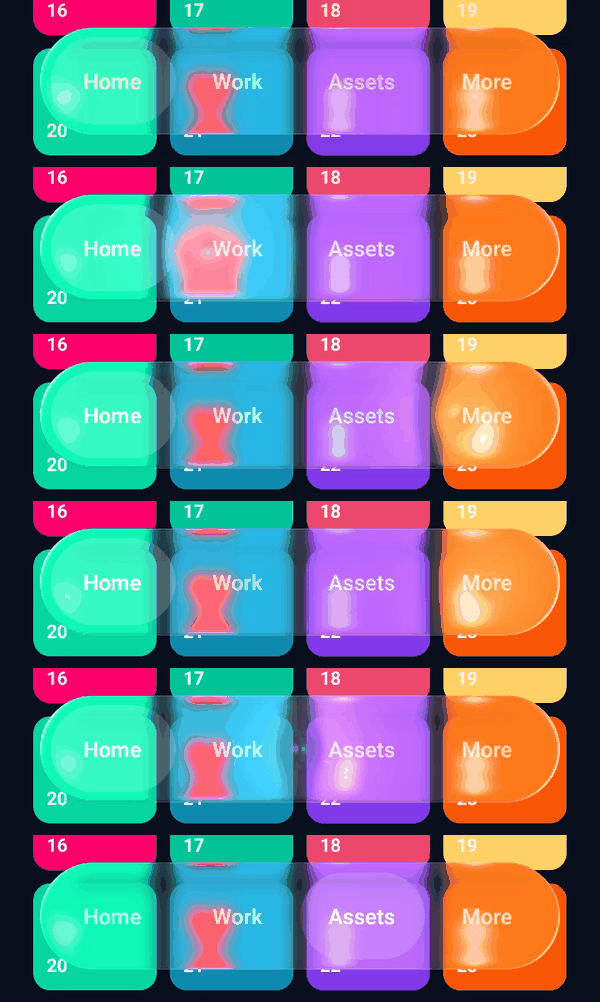
iOS 26 simulator (Apple's interactive glass, first) and the Android 16 emulator (second).
Set blurRadius to override a variant's blur on Android.
On Android 13+ (API 33) it is live blur with an AGSL lens chained after it:
- a band along the border pulls the blurred backdrop inward, following a quarter-circle profile, so content folds back on itself at the rim — the "mirrored" edge you see on iOS;
- a hairline lit from the upper left, brightest where the edge faces the light or directly away from it, with a soft glow on the lit side;
- a faint colour fringe, from sampling red and blue slightly apart.
It needs a <BlurTarget>, like live blur. It falls back to live on Android 12, and to snapshot below that.
Tips:
- Want more distortion? Blur less. A lens can only bend detail it can still see:
glassVariant="clear", or a smallblurRadius, shows the edge distortion most. saturationis Android-only. A blur washes colour out; around1.5–1.8brings Android glass back to iOS's vividness. The comparison above uses1.8.- A uniform
borderRadiusonly. The lens and the clip both need one; per-corner radii leave it square.
What it costs. Measured on a Galaxy A22 (Helio G80, Mali-G52), the weakest phone we have: the lens adds no measurable GPU time, and about 0.4ms of RenderThread time per frame over live. At 60Hz it holds the frame rate, with P90 frame times of 15–25ms and at most 3.6% janky frames. At 90Hz that phone runs both live and glass at the edge of its budget, and glass tips over more often: 2–14% janky frames depending on the run, against live's 1.4–2.2%. It never captures above half resolution, whatever downsampling says, because at full resolution it measured 100% jank at 90Hz. The full numbers and traces are in RESULTS.md.
The Android lens draws on two open-source implementations of Liquid Glass for Android: Kyant0/AndroidLiquidGlass (Apache-2.0), for the lens profile, and QWEA0/Liquid-Glass-Android (MIT), for the highlight and the dispersion.
On iOS the overlay is a UIVisualEffectView and has always re-blurred whatever
moves behind it. On Android 12+ (API 31), blurMode="live" does the same — a
list can scroll behind a frosted panel and stay blurred.
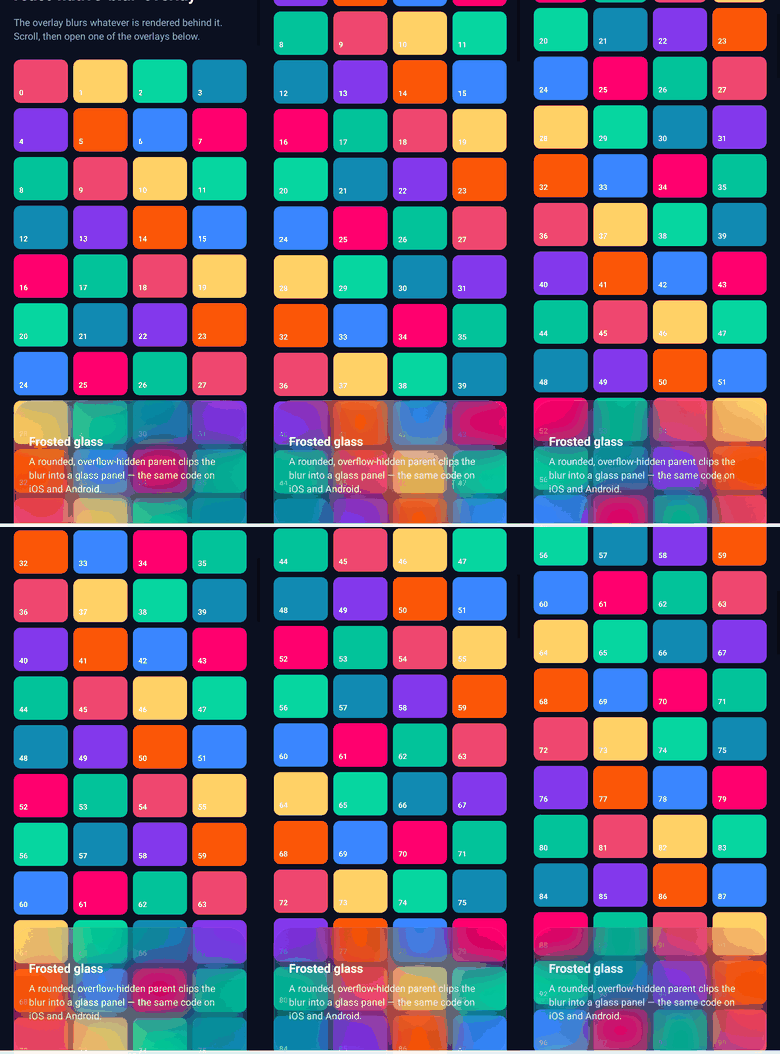
The example app on a Galaxy A22 — 2021 low-end hardware — with blurMode="live" at its defaults.
It needs to know what to blur. An overlay cannot blur a subtree it is part
of, so wrap the content that should show through the glass in a <BlurTarget>
and keep the overlay outside it:
import BlurOverlay, { BlurTarget } from 'react-native-blur-overlay';

<View style={{ flex: 1 }}>
  <BlurTarget style={{ flex: 1 }}>
    <FlatList data={items} renderItem={renderItem} />
  </BlurTarget>

  {/* A sibling of the target, not a child. */}
  <BlurOverlay visible blurMode="live" radius={20} captureOutset={20} style={styles.panel}>
    {/* ... */}
  </BlurOverlay>
</View>
<BlurTarget> is a plain view — it lays out, draws and takes touches like one,
and on iOS it is one. Usually there is one of them, wrapping your screen; give
them matching id props if you need more than one.
Nesting the overlay inside the target does not work, and it is worth knowing why, because it looks like it should: Android re-uses a view's recorded display list rather than re-drawing it, so a capture that contains the overlay either blanks the overlay or makes the platform drop the backdrop entirely, with nothing in the logs. The library checks for it and falls back to a snapshot with a warning instead of showing you the failure.
Per drawn frame: one re-record of the target, one RenderEffect blur on the
RenderThread. Nothing at all on a still screen — the work is tied to frames
actually being drawn.
Measured in the example app — a 400-cell FlatList scrolling behind a
full-width frosted panel — on a Galaxy A22 (Android 13, Helio G80 / Mali-G52,
release build, medians of 3 interleaved runs):
| 60Hz | 90Hz | |
|---|---|---|
| no overlay | 13ms P90, 0.17% janky | 11ms P90, 0.23% janky |
blurMode="snapshot" |
14ms P90, 0.17% janky | 12ms P90, 0.34% janky |
blurMode="live", defaults |
14ms P90, 0.52% janky | 14ms P90, 1.50% janky |
That is 2021 low-end hardware, so treat it as a floor rather than a typical number. The full sweep, including the configurations that do blow the budget, is in docs/live-blur/RESULTS.md.
Three knobs bound it:
downsamplingdefaults to2for live blur (the snapshot default stays1), and it is the one that matters: at1, the same panel measured 25ms P90 and ~6% janky frames at 60Hz on that phone.maxUpdateFps(default30) caps how often the blur is refreshed. A blur a frame behind is much harder to notice than a scroll that stutters — and uncapped, the same panel janked 31–56% of frames at 90Hz.captureOutsetgrows the captured region past the overlay's edges. A blur clamps at the edge of what it can see, which smears the first pixels inside the border; roughly aradiusof outset replaces that with real content.
An RN <Modal> is a separate Android window, and no capture technique can
reach the app behind another window. That is a hard wall for every
capture-based blur library on Android.
blurMode="live" gets past it by not capturing at all: inside a modal it asks
the system to blur behind the modal's window, which SurfaceFlinger composites
for free. No <BlurTarget> is needed and there is no per-frame cost of ours.
<Modal visible={open} transparent animationType="fade" onRequestClose={close}>
  <BlurOverlay visible blurMode="live" radius={14} brightness={-40} fadeDuration={0}>
    <View style={styles.card}>{/* ... */}</View>
  </BlurOverlay>
</Modal>
What changes on this path, because nothing is being captured:
downsampling,maxUpdateFps,captureOutsetandblurTargetIdare inert.radiusapplies unchanged.brightnessbecomes a scrim over the blur rather than a shift of its pixels, since the compositor owns them. Equal-looking at the tints an overlay actually uses, and it degrades sensibly at the extremes.- The blur reaches under the status and navigation bars, which a snapshot does not — a snapshot captures the activity's content view.
- The overlay has to cover the modal. A window blur cannot be scoped to part of a window, so an overlay that covers only part of one is refused rather than blurring pixels you did not ask for. It falls back to a snapshot of its own bounds.
It is the system's to give, and it declines in three ways — some GPUs never
support cross-window blur, battery saver turns it off everywhere, and the
overlay may not cover the modal. All three fall back to snapshot, which still
shows the app behind the modal, frozen, and each logs its own reason.
blurMode="live" needs API 31. Below that, snapshotUpdateFps retakes the
snapshot on a timer instead of freezing it:
<BlurOverlay visible snapshotUpdateFps={30} downsampling={4} radius={80} />Use 30. Lower rates do not look like a slower blur, they look like a
slideshow: the backdrop sits frozen and then jumps. At 5 retakes a second it is
frozen for 200ms at a time and at 15 for 66ms, and both read as broken. At 30 it
reads as a blur following the content — but it is not invisible, and someone
watching for it will still see the backdrop trail the scroll slightly. That is
the honest ceiling of this path: it is the coarse fallback, and it stays coarse.
Where blurMode="live" is available, use that instead — a live blur at the same
30fps cap has no perceptible trail at all, because it re-records the subtree on
the GPU rather than recapturing the screen.
At downsampling={4} it measured 13ms P90 / 0.17% janky on a Galaxy A22 —
the same as a screen with no overlay on it at all, and within 2ms of that
baseline at every rate and downsampling tested. For a full-screen software
capture plus a Stack Blur, thirty times a second, on 2021 low-end hardware.
So the rate is not what you need to economise on; downsampling is — keep it at
3–4 here, where a single frozen snapshot can afford 1.
It is still off by default, because a frozen snapshot is what every 3.0 app
already gets and turning this on for them would be a behaviour change. It
applies wherever a snapshot is what you are getting, including as the fallback
under a blurMode="live" that could not run, so setting both gives you live
blur where it exists and a coarse-but-moving backdrop where it does not.
Works on both platforms — iOS blurs whatever is behind the overlay's own frame, and Android crops its snapshot to the overlay's position on screen. Give the overlay an explicit position and size, or mount it inside the view you want blurred:
// Inside the view you want blurred — the overlay fills its parent:
<View style={{ height: 240 }}>
  <BlurOverlay visible />
</View>

// Or with an explicit box (the defaults pin all four edges, so release the
// two you replace):
<BlurOverlay
  visible
  style={{ top: 80, left: 24, width: 300, height: 200, right: 'auto', bottom: 'auto' }}
/>This is the default: presses that land on the children are left to the children, and only presses on the backdrop call onPress. Note that a plain View does not capture touches in React Native — the library wraps your children in a touch-claiming view sized to them. Pass closeOnChildPress if you want every press to call onPress.
radius is in physical pixels, not dp, so the same number is a different
amount of blur on every screen: 20 is a soft haze on a density-1 phone and
close to invisible on a density-3 one. Scale it if you want the panel to look
the same everywhere, and to match the iOS material beside it:
import { PixelRatio } from 'react-native';

const RADIUS = Math.round(PixelRatio.get() * 20); // ~20dp of blur on any screen
The default stays at 20 because changing it would silently restyle every app
that already ships this library, but on a modern phone it is almost certainly
lower than you want. The example app scales it, and 30–40dp is where a panel
starts reading as frosted glass rather than as a tint.
There is one ceiling worth knowing about, and the two Android paths do not share it:
snapshotruns Stack Blur, which clamps its radius at 25 after downsampling. So a snapshot saturates atradius = 25 × downsampling—50at the defaultdownsampling={2}— and gets no blurrier above that.liveuses the platform'sRenderEffectand has no such cap.
Above that ceiling the two modes stop showing the same amount of blur, which is
visible if you toggle blurMode at runtime. Raising downsampling raises the
ceiling and costs less, so it is usually the better lever: downsampling={4}
puts the ceiling at 100.
radius and downsampling interact, and it shows. A downscaled capture is
upscaled again after blurring, and a large blur leaves no fine detail to hide
the interpolation — so the same downsampling={2} that is invisible at
radius={20} starts looking coarse and banded from about radius={80} up. If a
big blur looks low-quality rather than soft, that is the downscale showing
through, and the fix is a lower downsampling, which costs more. On the live
path the radius itself is close to free — radius={160} measured 15ms P90
against 14ms for radius={20}, eight times the blur for one millisecond — so
quality, not frame time, is what bounds how large you go.
A blur is also an average, so a larger radius desaturates: mixed colours
pull toward grey. iOS materials compensate with a saturation boost; on Android,
set saturation (around 1.8 matches iOS) to do the same. brightness cannot
fix it — it shifts luminance, not saturation.
Blurring a full-screen snapshot costs the most on Android. Raise downsampling (2–4 is a good range) — the capture is scaled down before blurring, and the effective radius is adjusted so the result looks about the same. It is the knob that matters on every path that captures: live blur defaults to 2 for exactly this reason, and a periodic re-blur wants at least that.
openOverlay() does nothing. The id has to match on both sides: an overlay rendered with id="x" only listens to openOverlay('x'). In development the library warns when a call finds no matching overlay. Overlays driven by the visible prop deliberately ignore these calls.
The Android blur shows a stale screen. 3.0 takes the snapshot when the overlay is mounted, so opening it right after a navigation transition can still catch the tail of the animation. Delay the openOverlay() call until the transition has settled.
The blur is transparent/black on Android. view.draw() cannot capture hardware surfaces — video players, camera previews, maps and other SurfaceView-based content come out blank. That is a platform limitation of capture-based blurring, and it applies to snapshot and in-window live alike. The window blur inside a <Modal> is the one path that is not affected.
blurMode="live" is not live. It falls back to snapshot rather than failing, and it says why in logcat under the BlurOverlay tag — adb logcat -s BlurOverlay. The usual reasons: the device is below Android 12; there is no <BlurTarget> in the same window as the overlay (a <Modal> is its own window, so a target outside it does not count); the overlay is inside the target, which cannot work; or, in a modal, cross-window blur is off or the overlay does not cover the window.
borderRadius shapes the blur, except per-corner. A uniform borderRadius works on every path. Per-corner radii — borderTopLeftRadius and friends — shape a snapshot but leave a live blur square, because a live blur is clipped by a RenderNode outline and Android only lets those be a rectangle, circle or uniform round rect. Wrap the overlay in a rounded, overflow: 'hidden' parent if you need that shape live.
- Autolinking: remove the manual
Podfileentry and the manualSajjadBlurOverlayPackageregistration. - React Native >= 0.80 is required, and the package now works on the New Architecture.
idBlur→id,customStyles→style,animationDuration→fadeDuration. The old names still work.onPressno longer fires for presses on your children. PasscloseOnChildPressto get the old behaviour.- Android props behave the same, but
radiusis now capped at 25 after downsampling. - 2.x published
index.tsxas the package entry point and imported Node'seventsmodule, which Metro cannot resolve; 3.0 ships a compiled build with type definitions.
The repo ships a small app that exercises every prop — imperative and
declarative opening, the iOS blur styles, the Android radius/downsampling, live
blur behind a scrolling list, a blurred <Modal>, a panel shaped by its own
borderRadius, a partial-screen overlay and press handling:
npm install
npm run example:start     # in one terminal
npm run example:android   # or: npm run example:ios
It is an npm workspace of the library and Metro resolves the library to its
TypeScript sources, so editing src/ refreshes the app without a rebuild.
3.1.0 brings live blur to Android and Liquid Glass to both
platforms: blurMode="live" for a panel in your own
window, the system's window blur behind a <Modal>,
blurMode="glass", saturation, coarse periodic updates
below Android 12, and borderRadius / borderWidth / backgroundColor
finally working on the Android overlay itself.
3.2 adds glassVariant, glassTint and interactive glass, each built on both
platforms at once, and blurRadius, a blur radius in dp. Next: glass shapes that
merge as they approach each other, as iOS's UIGlassContainerEffect does. The constraints, research,
measurements and plan are in docs/live-blur/PLAN.md
and RESULTS.md.
npm install            # installs deps and builds the library
npm run typecheck
npm test
npm run check:android  # compiles the Java against React Native's classes
npm run check:ios      # type-checks the Obj-C(++) on both architectures (needs Xcode)
The two native checks need neither an example app nor a CocoaPods/Gradle
install: they fetch React Native's own headers and classes for the version in
node_modules and run clang/javac against the Codegen output. CI runs all
of them.
The Codegen spec lives in src/SajjadBlurOverlayNativeComponent.ts; the native implementations are in android/src/main/java/com/bluroverly and ios.
Releases are published from CI with npm Trusted Publishing: bump the version, tag it vX.Y.Z and push the tag.
MIT © Sajjad Asadi